
Introduction:
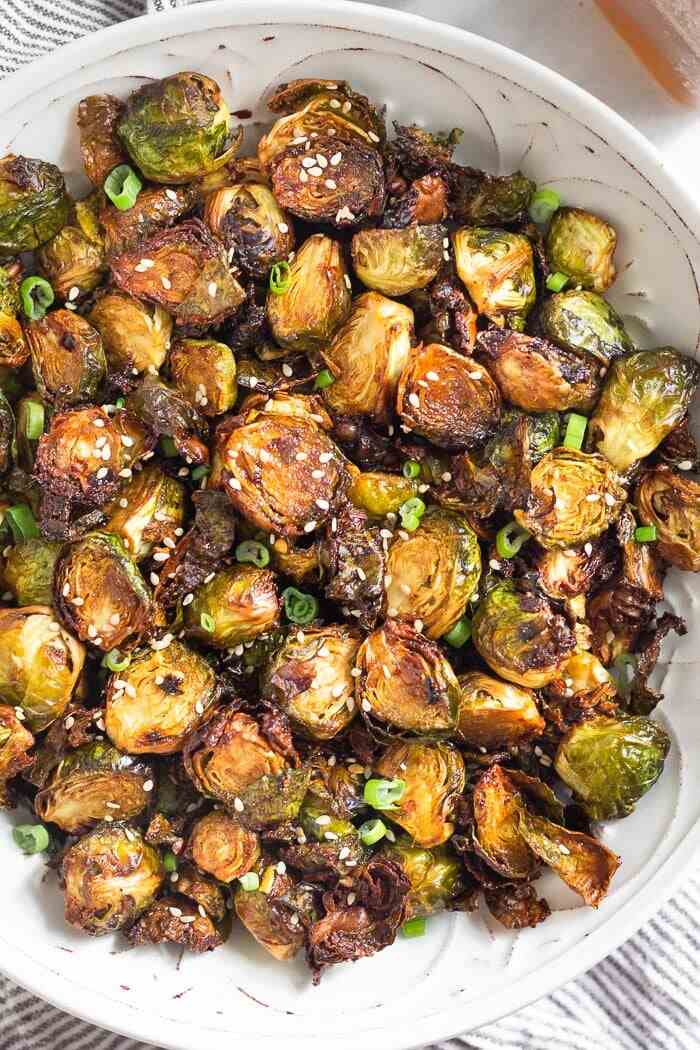
Best Air Fryer Brussel Sprouts Brussels sprouts have undergone a culinary renaissance in recent years. Once a vegetable that elicited groans from the dinner table, they are now a beloved staple in trendy restaurants and home kitchens alike. The secret to their resurgence? The air fryer. This modern kitchen gadget transforms Brussels sprouts into a crispy, caramelized delight with minimal effort and time. Here’s a guide to making the best air fryer Brussels sprouts, guaranteed to convert even the most skeptical eaters.

Why Choose an Air Fryer?
Air fryers have become incredibly popular due to their ability to create crispy, delicious food with a fraction of the oil required for traditional frying methods. By circulating hot air around the food, air fryers produce a texture similar to deep-frying but in a healthier, more convenient way. For Brussels sprouts, this means achieving a perfect balance of tender interiors and crispy, golden exteriors.
Selecting the Best Brussels Sprouts
To start, selecting high-quality Brussels sprouts is crucial. Look for bright green sprouts that are firm to the touch. Avoid those with yellowing leaves or black spots, as these indicate age or poor storage. Smaller sprouts tend to be sweeter and more tender, while larger ones have a more robust flavor.
Preparing Brussels Sprouts for Air Frying
Cleaning and Trimming: Rinse the Brussels sprouts under cold water to remove any dirt. Trim off the tough ends and remove any yellow or damaged outer leaves. If the sprouts are particularly large, consider cutting them in half to ensure even cooking.
Seasoning: The beauty of Brussels sprouts lies in their versatility. A simple preparation involves tossing them in olive oil, salt, and pepper. For added flavor, consider incorporating minced garlic, lemon zest, or a sprinkle of Parmesan cheese. If you prefer a sweeter profile, a drizzle of balsamic glaze or honey can elevate the dish.
Cooking Brussels Sprouts in the Air Fryer
Preheat the Air Fryer: Preheating is essential for even cooking. Set your air fryer to 375°F (190°C) and let it preheat for about 5 minutes.
Cooking Process: Place the seasoned Brussels sprouts in the air fryer basket in a single layer. Avoid overcrowding to ensure maximum crispiness.
Cooking Time: Cook the Brussels sprouts for 15-20 minutes, shaking the basket halfway through to ensure even browning. The sprouts should be golden brown and crispy on the outside while tender on the inside.
Creative Flavor Variations
Asian-Inspired: Toss the Brussels sprouts in soy sauce, sesame oil, and a touch of sriracha before air frying.
Mediterranean: Season the sprouts with olive oil, lemon juice, garlic powder, and oregano. After air frying, top with crumbled feta cheese and sun-dried tomatoes.
Buffalo Style: For a spicy twist, coat the sprouts in a mixture of melted butter and hot sauce. After air frying, serve with a side of blue cheese dressing for dipping.
Maple Bacon: Combine chopped bacon and a drizzle of maple syrup with the Brussels sprouts before air frying. The bacon will crisp up and the syrup will caramelize, creating a savory-sweet delight.
Serving Suggestions
Best Air Fryer Brussel Sprouts Air fryer Brussels sprouts make an excellent side dish for a variety of meals. They pair wonderfully with roasted meats, grilled fish, or even as a topping for a hearty salad. For a simple yet elegant appetizer, serve them with a garlic aioli or a tangy mustard dip.
Storing and Reheating
If you have leftovers (though they are so delicious, this is unlikely), store them in an airtight container in the refrigerator for up to three days. To reheat, simply pop them back in the air fryer for a few minutes to regain their crispiness.
Conclusion
Best Air Fryer Brussel Sprouts Air fryer Brussels sprouts are a game-changer, turning a once-maligned vegetable into a crispy, flavorful treat. With the right selection, seasoning, and cooking techniques, you can create a dish that’s both healthy and irresistibly delicious. Whether you’re a Brussels sprouts aficionado or a newfound fan, this air fryer method is sure to become a favorite in your culinary repertoire.
What are the best conditions for brussel sprouts?
Brussels sprouts, a member of the Brassica family, are known for their miniature cabbage-like appearance and dense nutritional profile. Growing these sprouts can be a rewarding endeavor, but it requires understanding their specific growing conditions to ensure a bountiful harvest. Here’s a comprehensive guide to cultivating Brussels sprouts under optimal conditions.
Ideal Climate for Brussels Sprouts
Brussels sprouts thrive in cooler climates, making them well-suited for regions with mild summers and cool falls. They prefer temperatures ranging from 45°F to 75°F (7°C to 24°C). The plants are remarkably cold-hardy and can withstand light frosts, which can actually enhance the flavor by increasing the sugar content in the sprouts.
Cool Season Planting: Brussels sprouts are typically planted in late summer to early fall for a fall or early winter harvest. In areas with milder winters, they can be grown almost year-round. The key is to ensure that the sprouts mature during cool weather.
Frost Tolerance: While mature plants can survive temperatures as low as 20°F (-6°C), young seedlings are more vulnerable to frost. Using row covers can protect seedlings during unexpected cold snaps.
Soil Requirements
Brussels sprouts require well-draining soil rich in organic matter. They prefer a pH level between 6.0 and 6.8, which helps prevent nutrient deficiencies and diseases.
Soil Preparation: Before planting, enrich the soil with compost or well-rotted manure to improve fertility and drainage. A balanced fertilizer can also be incorporated into the soil to provide essential nutrients.
Soil Texture: Loamy soil is ideal for Brussels sprouts. If your soil is heavy clay or sandy, amend it with organic matter to improve its structure and nutrient-holding capacity.
Sunlight and Watering
Brussels sprouts need full sun to partial shade, with at least 6 hours of direct sunlight per day to produce well-formed sprouts.
Sunlight: Ensure the planting site receives adequate sunlight to promote vigorous growth. In hotter climates, providing some afternoon shade can help prevent the plants from bolting.
Watering: Consistent moisture is crucial for Brussels sprouts. Water deeply to encourage deep root growth but avoid waterlogging, which can lead to root diseases. Mulching around the plants helps retain soil moisture and regulate soil temperature.
Spacing and Planting
Proper spacing and planting techniques are vital for healthy Brussels sprout growth.
Seed Starting: Start seeds indoors 4-6 weeks before the last expected frost date, or sow them directly into the garden in mid to late summer. Transplant seedlings when they are 4-6 inches tall.
Spacing: Space the plants 18-24 inches apart in rows that are 30-36 inches apart. Adequate spacing ensures good air circulation, reducing the risk of fungal diseases and allowing the plants to grow to their full size.
Care and Maintenance
Fertilization: Apply a balanced fertilizer once a month or use a slow-release fertilizer at planting time. Side-dressing with compost or a nitrogen-rich fertilizer midway through the growing season can boost growth.
Use row covers to protect young plants and apply organic insecticidal soap or neem oil as needed. Rotate crops annually to prevent soil-borne diseases like clubroot.
Staking: Tall varieties or plants grown in windy areas may require staking to prevent them from toppling over as they mature.
Harvesting Brussels Sprouts
Timing: Brussels sprouts are ready to harvest when the small heads are firm and 1-2 inches in diameter. Start from the bottom of the stalk and work your way up, as the lower sprouts mature first.
Harvesting Method: Twist or cut the sprouts off the stalk, taking care not to damage the plant. For a sweeter flavor, harvest after a light frost.
Post-Harvest: After harvesting the sprouts, the plant’s top leaves can be pinched off to encourage further growth. The tops of the plants are also edible and can be used like collard greens.
Conclusion
Best Air Fryer Brussel Sprouts Growing Brussels sprouts requires attention to their specific needs for cool temperatures, rich soil, and consistent care. By providing the right conditions, gardeners can enjoy a plentiful harvest of these nutritious and flavorful vegetables. Whether you’re a seasoned gardener or a novice, following these guidelines will help you cultivate healthy Brussels sprouts that will be a delightful addition to your table.
What happens when you over cook brussel sprouts?
Best Air Fryer Brussel Sprouts with their delightful bite-sized form and robust nutritional benefits, have become a favorite in many kitchens. However, achieving the perfect texture and flavor can be tricky, and overcooking Brussels sprouts is a common mistake that can significantly alter their appeal. Here’s a detailed look at what happens when you overcook Brussels sprouts and how to avoid this culinary pitfall.
The Chemical Transformation
When Brussels sprouts are overcooked, a series of chemical changes occur that affect their texture, flavor, and nutritional content.
Texture Changes: Overcooking Brussels sprouts leads to a mushy, unpleasant texture. The cellular structure breaks down excessively, causing the sprouts to lose their firm bite and become soggy. This can be particularly off-putting for those who prefer their vegetables with a bit of crunch.
Flavor Alterations: One of the most notable consequences of overcooking Brussels sprouts is the development of a strong, sulfurous odor and taste. When overcooked, these compounds break down into hydrogen sulfide and other sulfur compounds, resulting in a pungent smell and a bitter, off-putting flavor. This is often what people remember from poorly prepared Brussels sprouts and why they may have a negative perception of the vegetable.
Nutritional Loss: Overcooking Brussels sprouts can also diminish their nutritional value. Heat-sensitive vitamins, such as vitamin C and certain B vitamins, degrade with prolonged cooking. This means that while you may still get fiber and minerals, the overall health benefits of the sprouts are reduced.
Aesthetic and Sensory Impact
Beyond the chemical and nutritional changes, overcooked Brussels sprouts suffer in terms of their visual and sensory appeal.
Color: Fresh Brussels sprouts have a vibrant green color. Overcooking turns them an unappetizing olive green or even a greyish hue. This is due to the breakdown of chlorophyll, the pigment responsible for their bright green color.
Aroma: The smell of overcooked Brussels sprouts can be quite off-putting. The release of hydrogen sulfide and other volatile sulfur compounds during overcooking creates a strong, unpleasant odor that can linger in the kitchen.
Taste: The bitterness of overcooked Brussels sprouts is a major turnoff for many people. The intensified sulfur compounds overshadow the natural sweetness and nutty flavor that properly cooked Brussels sprouts can have.
How to Avoid Overcooking Brussels Sprouts
Monitor Cooking Time: Whether you’re roasting, steaming, boiling, or sautéing Brussels sprouts, keeping a close eye on the cooking time is crucial. Generally, they should be cooked until just tender, about 15-20 minutes for roasting, 6-8 minutes for steaming, and 8-10 minutes for boiling. Always test for doneness with a fork; they should be tender but still have a slight resistance.
High Heat Cooking Methods: Roasting and sautéing at high temperatures can help develop a caramelized, crispy exterior while keeping the interior tender. This method enhances the natural sweetness and reduces the likelihood of developing a bitter flavor.
Use Acidic Ingredients: Incorporating acidic ingredients such as lemon juice or vinegar can help balance and brighten the flavors of Brussels sprouts, even if they are slightly overcooked. Acids can mitigate some of the sulfurous compounds, improving the overall taste.
Blanching and Shocking: For boiling or steaming methods, consider blanching the Brussels sprouts for a short period and then shocking them in ice water to halt the cooking process.
Seasoning and Additions: Proper seasoning and adding ingredients like garlic, shallots, bacon, or balsamic vinegar can enhance the flavor of Brussels sprouts. These additions can complement their natural taste and mask any slight overcooking effects. Easy Hamburger Recipe: Mix ground beef, bread crumbs, egg, salt, pepper, and garlic. Shape into patties, grill to perfection!
Conclusion
Best Air Fryer Brussel Sprouts Overcooking Brussels sprouts can result in a mushy texture, unpleasant sulfurous odor, bitter flavor, and reduced nutritional value. To fully enjoy the potential of this nutritious vegetable, it’s essential to monitor cooking times carefully and use methods that preserve their natural qualities. By understanding the consequences of overcooking and employing techniques to avoid it, you can transform Brussels sprouts into a delicious and healthy addition to your meals.
Does soaking brussel sprouts help?
Brussels sprouts have become a popular vegetable choice for their unique flavor and impressive nutritional profile. However, like many cruciferous vegetables, their preparation can significantly impact their taste and texture. One common question that arises is whether soaking Brussels sprouts before cooking can enhance their culinary qualities. Here, we explore the benefits and techniques of soaking Brussels sprouts and how it can influence your cooking experience.
Benefits of Soaking Brussels Sprouts
Dirt and Debris Removal:
Cleaning: Brussels sprouts often have dirt, pesticides, and small insects trapped in their tightly packed leaves. Soaking them in water can help loosen and remove these unwanted elements, ensuring that the sprouts are clean and safe to eat.
Saltwater Soak: Adding a bit of salt to the soaking water can be particularly effective in drawing out any insects or larvae hidden within the leaves.
Improving Texture:
Hydration: Soaking Brussels sprouts can help hydrate their outer leaves, which might otherwise dry out during cooking. This can result in a more tender and pleasant texture, especially if the sprouts have been stored for a while and have lost some moisture.
Crispier Leaves: For those who enjoy crispy Brussels sprout leaves, soaking can help achieve a more desirable texture when roasting or air frying.
Reducing Bitterness:
Leaching Compounds: Soaking can help leach out some of the sulfur-containing compounds that contribute to the bitterness of Brussels sprouts. This is particularly beneficial for those who find the natural bitterness of these vegetables off-putting.
Milder Flavor: By reducing bitterness, soaking can make Brussels sprouts more palatable, especially for those new to this vegetable or for children.
Even Cooking:
Consistent Moisture: Soaking ensures that the sprouts have an even moisture content, which can lead to more consistent cooking. This is particularly important when using high-heat methods like roasting, as it can prevent some parts from becoming overly dry while others remain undercooked.
How to Soak Brussels Sprouts
Basic Soak:
Preparation: Trim the ends of the Brussels sprouts and remove any yellow or damaged outer leaves.
Soaking: Place the sprouts in a large bowl of cold water. Gently agitate the sprouts occasionally to help dislodge any dirt or debris.
Rinsing: After soaking, rinse the sprouts thoroughly under running water to remove any remaining dirt or loose leaves.
Saltwater Soak:
Preparation: As with the basic soak, trim and clean the sprouts.
Soaking Solution: Dissolve 1-2 tablespoons of salt in a large bowl of cold water. Add the sprouts and soak for 10-15 minutes. The saltwater helps to draw out any hidden insects and can also contribute to reducing bitterness.
Rinsing: Rinse the sprouts thoroughly under running water to remove the salt and any loosened debris.
Optional Enhancements:
Vinegar Soak: For an extra cleaning boost, add a splash of vinegar to the soaking water. This can help sanitize the sprouts and further reduce any bitterness.
Ice Water Soak: If you want to preserve the bright green color of the Brussels sprouts, consider soaking them in ice water after blanching. This can help set the color and maintain their visual appeal during cooking.
When Not to Soak Brussels Sprouts
Time Constraints:
Best Air Fryer Brussel Sprouts If you are short on time, soaking might not be feasible. In such cases, a thorough rinse under running water and careful inspection for debris can suffice.
Cooking Method:
If you plan to shred or finely slice the Brussels sprouts for a salad or slaw, soaking may not be necessary as the leaves will naturally separate and be easier to clean during the preparation process.
Conclusion
Soaking Brussels sprouts before cooking offers several benefits, including improved cleanliness, texture, and flavor. By incorporating a simple soaking step into your preparation routine, you can enhance the culinary qualities of these nutritious vegetables. Whether you’re aiming for a milder taste, cleaner sprouts, or a more consistent cooking result, soaking can be a valuable technique in your kitchen arsenal. So, next time you’re preparing Brussels sprouts, consider giving them a soak to unlock their full potential.
Crispy Air Fried Brussels Sprouts :
Brussels sprouts have undergone a culinary transformation from a dreaded childhood vegetable to a trendy dish in upscale restaurants and home kitchens. The secret to this newfound popularity? The air fryer. This modern kitchen gadget can transform Brussels sprouts into a crispy, caramelized treat that’s as healthy as it is delicious. Here’s everything you need to know to make perfect crispy air-fried Brussels sprouts.
Why Air Fry Brussels Sprouts?
Air frying Brussels sprouts offers several advantages:
Healthier Cooking: Air fryers use significantly less oil than traditional frying methods, making your Brussels sprouts healthier without sacrificing the crispy texture.
Quick and Convenient: Air frying is fast, allowing you to enjoy perfectly cooked Brussels sprouts in a fraction of the time it takes to roast them in the oven.
Consistent Results: The circulating hot air ensures even cooking, giving your Brussels sprouts a uniformly crispy exterior and tender interior.
Selecting the Best Brussels Sprouts
To achieve the best results, start with high-quality Brussels sprouts:
Freshness: Choose bright green Brussels sprouts that are firm to the touch.
Size: Smaller sprouts tend to be sweeter and more tender, while larger ones have a more robust flavor. Halving larger sprouts can help ensure even cooking.
Preparing Brussels Sprouts for Air Frying
Cleaning: Rinse the Brussels sprouts under cold water to remove any dirt. Trim the tough ends and remove any yellow or damaged outer leaves.
Cutting: Cut the Brussels sprouts in half if they are large. This helps them cook more evenly and ensures a crispy texture.
Seasoning Options
The key to delicious crispy air-fried Brussels sprouts is in the seasoning. Here are some popular options:
Classic: Toss the sprouts in olive oil, salt, and pepper for a simple and delicious flavor.
Garlic Parmesan: Add minced garlic, grated Parmesan cheese, and a squeeze of lemon juice for a savory and tangy twist.
Balsamic Glaze: Drizzle with balsamic vinegar and a touch of honey for a sweet and tangy caramelization.
Spicy: Mix with olive oil, salt, pepper, and a sprinkle of red pepper flakes or a dash of hot sauce for some heat.
Air Frying Process
Preheat the Air Fryer: Preheat your air fryer to 375°F (190°C) for about 5 minutes. Preheating ensures that the Brussels sprouts cook evenly from the start.
Arrange the Sprouts: Place the seasoned Brussels sprouts in the air fryer basket in a single layer. Avoid overcrowding to ensure maximum crispiness. If needed, cook in batches.
Cooking Time: Air fry for 15-20 minutes, shaking the basket halfway through to ensure even cooking. The Brussels sprouts are done when they are golden brown and crispy on the edges.
Tips for Perfectly Crispy Brussels Sprouts
Dry the Sprouts: Ensure the Brussels sprouts are completely dry before seasoning.
Use Enough Oil: While you don’t need much oil, a light coating helps achieve that desired crispy texture.
Don’t Overcrowd: Giving the sprouts enough space allows the hot air to circulate and crisp them up evenly.
Serving Suggestions
Crispy air-fried Brussels sprouts make a versatile side dish or snack:
Side Dish: Serve alongside roasted chicken, grilled steak, or baked fish for a nutritious and flavorful side.
Appetizer: Serve with a dipping sauce like garlic aioli, ranch, or a spicy sriracha mayo for a crowd-pleasing appetizer.
Salad Topper: Add to salads for an extra crunch and burst of flavor. They pair well with leafy greens, nuts, dried cranberries, and a tangy vinaigrette.
Storing and Reheating
If you have leftovers (though they’re usually so delicious, it’s rare), store them in an airtight container in the refrigerator for up to three days. To reheat, simply pop them back in the air fryer for a few minutes to regain their crispiness. Declutter counters, wipe surfaces, wash dishes, clean appliances, sweep, mop floors, and empty trash.
Conclusion
Best Air Fryer Brussel Sprouts Crispy air-fried Brussels sprouts are a game-changer, turning this humble vegetable into a deliciously addictive snack or side dish. With the right preparation, seasoning, and cooking technique, you can enjoy perfectly crispy sprouts every time. So next time you’re looking for a healthy and tasty addition to your meal, reach for the Brussels sprouts and your air fryer – you won’t be disappointed.
As an Amazon Associate, We earn from qualifying purchases. When you purchase a product through Amazon links on kitchenadvising.com, we may earn a small commission at no extra cost to you. This helps support the site and keep our content free.