
Introduction:
Cooking Sushi Rice In Rice Cooker a beloved dish worldwide, owes much of its appeal to the delicate, flavorful sushi rice that serves as its base. Cooking sushi rice may seem daunting, especially for those new to Japanese cuisine, but with the right techniques and a trusty rice cooker, anyone can achieve perfect results at home. This guide will walk you through the process of cooking sushi rice in a rice cooker, ensuring a balanced, sticky, and delicious foundation for your sushi creations.

Understanding Sushi Rice
Sushi rice, known as shari or sumeshi in Japanese, is made from a short-grain variety of rice called Japonica. This rice is known for its high starch content, which makes it sticky enough to hold together when shaping sushi. The key to great sushi rice lies not just in the cooking but also in the seasoning, which is a careful blend of rice vinegar, sugar, and salt.
Step 1: Choosing the Right Rice
Start by selecting the right type of rice. Look for rice labeled as “sushi rice” or Japonica rice at your local store. Avoid long-grain rice varieties like basmati or jasmine, as they lack the necessary stickiness for sushi.
Step 2: Rinsing the Rice
Rinsing the rice is an essential step to remove excess starch, which can make the rice too sticky or gummy. Measure the desired amount of rice (typically 2 cups for a small batch) and place it in a fine-mesh strainer. Continue rinsing until the water runs clear, which usually takes about 3-4 rinses.
Step 3: Soaking the Rice
After rinsing, transfer the rice to the rice cooker’s inner pot and add water. The general ratio is 1:1.2, meaning 1 cup of rice to 1.2 cups of water. Soaking the rice for about 30 minutes before cooking allows it to absorb water, ensuring even cooking and a plump, tender texture.
Step 4: Cooking the Rice
Close the lid of your rice cooker, select the white rice or regular cooking setting, and start the cooking process. Different rice cookers may have varying cooking times, but it generally takes around 20-30 minutes for the rice to cook. Once done, allow the rice to rest for 10 minutes in the cooker to let the moisture redistribute evenly.
Step 5: Preparing the Sushi Vinegar
While the rice is cooking, prepare the sushi vinegar (sushi-zu). In a small saucepan, combine 1/4 cup of rice vinegar, 2 tablespoons of sugar, and 1 teaspoon of salt. Gently heat the mixture, stirring until the sugar and salt are fully dissolved. Remove from heat and let it cool.
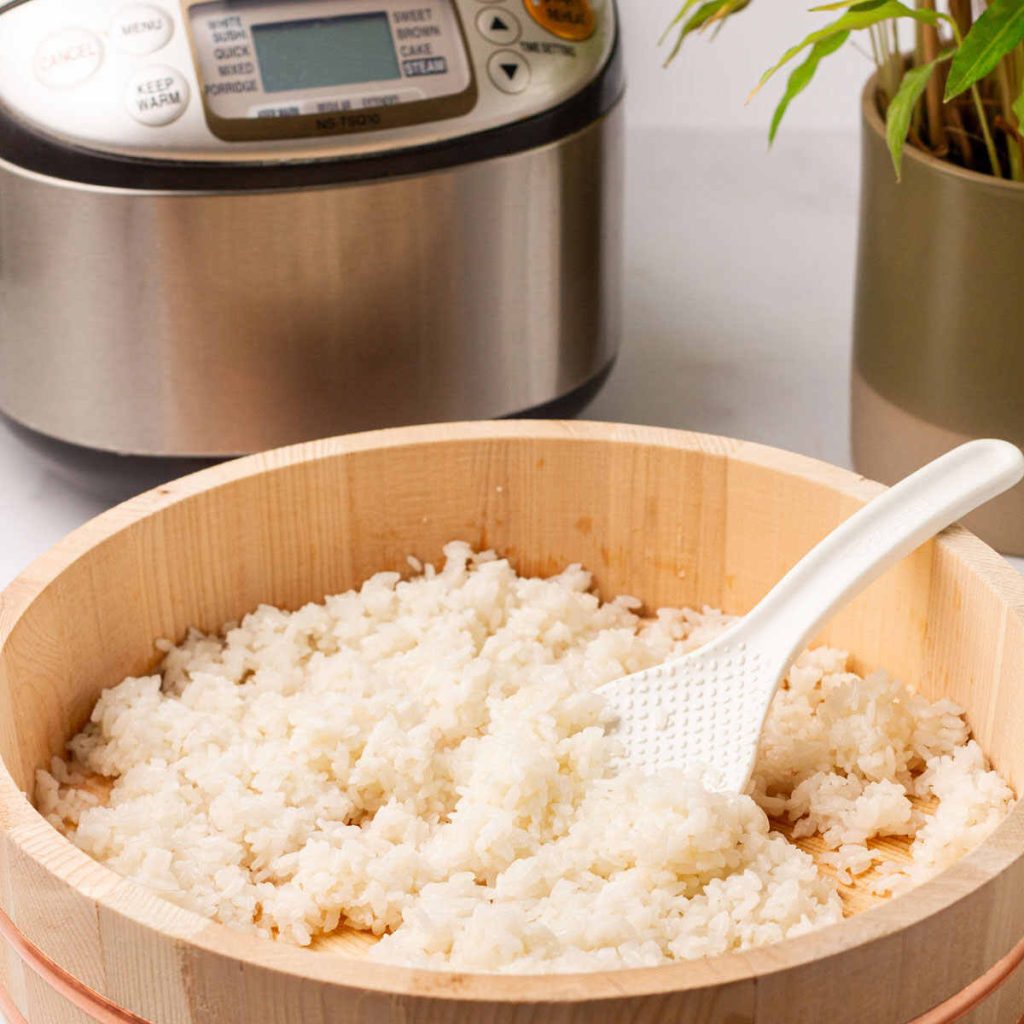
Step 6: Seasoning the Rice
Transfer the cooked rice to a large, shallow bowl (preferably a wooden hangiri). Pour the sushi vinegar over the rice, using a wooden paddle or spatula to gently fold the vinegar into the rice. Be careful not to mash the rice; instead, use a cutting motion to mix while fanning the rice to cool it down. This process ensures that the rice grains are evenly coated with the vinegar, giving the sushi rice its signature flavor.
Step 7: Letting the Rice Cool
Once the rice is seasoned, cover it with a damp cloth and let it cool to room temperature. This helps maintain the rice’s moisture and prevents it from drying out. Sushi rice is best used within a few hours of preparation.
Conclusion: The Foundation of Great Sushi
Cooking sushi rice in a rice cooker simplifies the process, making it accessible even for beginners. With the right rice, proper rinsing, and careful seasoning, you can create sushi rice that rivals that of your favorite sushi restaurant. Whether you’re making simple nigiri, elaborate rolls, or sushi bowls, mastering the art of sushi rice is the first step towards sushi success. So, the next time you’re in the mood for homemade sushi, reach for your rice cooker and get started on crafting the perfect base for your culinary creations.
Can you use long grain rice for sushi?
When it comes to making sushi, the type of rice you use is crucial to achieving the right texture, flavor, and overall quality of your dish. Sushi is traditionally made with short-grain rice, which is known for its stickiness and ability to hold together when shaped. But what happens if you only have long-grain rice on hand? Can you use it for sushi? The short answer is: not really, and here’s why.
The Importance of Rice in Sushi
Sushi rice, known as shari or sumeshi, is made from a specific type of short-grain rice called Japonica. This rice is characterized by its high starch content, particularly amylopectin, which gives it the sticky quality that is essential for sushi. The stickiness allows the rice to clump together, making it easier to form into rolls, nigiri, and other sushi shapes.
Long-Grain Rice: A Different Texture and Flavor Profile
Long-grain rice, such as basmati or jasmine, is quite different from short-grain rice. It contains more amylose and less amylopectin, resulting in a fluffier, separate-grain texture when cooked. This is ideal for dishes where you want the grains to remain distinct, like pilafs or fried rice, but it’s not suitable for sushi.
When you use long-grain rice for sushi, it lacks the necessary stickiness. The grains won’t hold together properly, making it difficult to shape the rice into rolls or form it around fillings. Additionally, long-grain rice has a drier texture and a slightly different flavor profile, which can affect the overall taste of your sushi.
Why Stick to Short-Grain Rice?
Using the correct type of rice is essential to achieving the authentic taste and texture of sushi. Short-grain rice’s sticky nature is what makes sushi a cohesive bite rather than a loose pile of rice. The slight sweetness and firm, yet tender, texture of short-grain rice also complements the delicate flavors of raw fish, vegetables, and other sushi ingredients.
Alternatives If You Don’t Have Short-Grain Rice
If you can’t find short-grain sushi rice, there are a few alternatives that might work in a pinch:
Medium-Grain Rice: Some medium-grain rice varieties, like Calrose, can be used as a substitute for sushi rice. While it’s not as sticky as short-grain rice, it’s closer in texture and can produce acceptable results.
Arborio Rice: Known for its use in risotto, Arborio rice is another alternative due to its higher starch content. However, it can be slightly too creamy for sushi.
Conclusion: The Right Rice Matters
While long-grain rice may be a pantry staple, it’s not suitable for making sushi. The unique qualities of short-grain sushi rice are what give sushi its characteristic texture and flavor. If you’re serious about making sushi at home, it’s worth seeking out the proper rice to ensure your creations are as authentic and delicious as possible. So, next time you’re planning a sushi night, make sure to stock up on short-grain rice and enjoy the satisfaction of perfectly prepared sushi.
Do you need to rinse sushi rice?
When it comes to making sushi at home, one of the most frequently asked questions is whether or not you need to rinse sushi rice before cooking it. While it might seem like an optional or trivial step, rinsing sushi rice is, in fact, a crucial part of the process that can significantly impact the quality and texture of your finished dish. Let’s explore why rinsing sushi rice is essential and how to do it properly.

Why Rinsing Sushi Rice Matters
Sushi rice, or shari, is made from short-grain rice, which has a high starch content. This starch is what gives sushi rice its characteristic stickiness, allowing it to hold together when shaped into sushi rolls or pressed into nigiri. However, the surface of uncooked sushi rice is coated with excess starch, which can lead to clumping, uneven cooking, and an overly gummy texture if not removed.
Rinsing the rice removes this surface starch, ensuring that the grains cook more evenly and produce the ideal texture for sushi. Without rinsing, you risk ending up with rice that is too sticky or mushy, which can make your sushi difficult to work with and less enjoyable to eat.
The Science Behind Rinsing
When sushi rice is harvested and processed, the grains are polished to remove the outer husk. This polishing process generates fine powdery starch on the surface of each grain. If this excess starch isn’t washed away, it mixes with the water during cooking and forms a sticky paste that can make the rice overly sticky and clump together in large, unmanageable masses.
Rinsing the rice also helps to remove any impurities or residues from the processing and packaging stages, contributing to a cleaner taste and appearance in the final dish.
How to Properly Rinse Sushi Rice
Rinsing sushi rice is a simple process, but it requires a bit of care to ensure you’re doing it right. Here’s a step-by-step guide:
Measure the Rice: Start by measuring the amount of sushi rice you need. Place it in a large bowl or directly into a fine-mesh sieve.
Initial Rinse: Add cold water to the bowl, enough to fully submerge the rice. Gently swirl the rice with your hand, allowing the water to become cloudy. This cloudiness is the starch being released. After a few seconds, drain the water.
Repeat Rinsing: Continue rinsing the rice by adding fresh water, swirling, and draining. You may need to repeat this process 3 to 5 times until the water runs clear. Clear water indicates that most of the excess starch has been removed.
Soak the Rice (Optional): After rinsing, some cooks recommend soaking the rice for about 30 minutes before cooking. This step allows the rice to absorb water evenly, leading to better texture and consistency when cooked.
Drain and Cook: Once rinsed (and soaked, if desired), drain the rice thoroughly and transfer it to your rice cooker or pot. Proceed with cooking according to your recipe or the instructions on the rice package.
What Happens If You Don’t Rinse the Rice?
Skipping the rinsing step can lead to several issues:
Overly Sticky Texture: The rice may become too sticky and difficult to work with, making it challenging to shape into sushi.
Uneven Cooking: The excess starch can cause the rice to cook unevenly, leading to some grains being undercooked while others are overcooked.
Gummy Mouthfeel: The rice may have a gummy or pasty texture, which is unappetizing and not ideal for sushi.
Conclusion:
Rinsing sushi rice is a small but crucial step that should not be overlooked. By removing excess starch and impurities, you ensure that your sushi rice cooks to perfection, with the ideal balance of stickiness and fluffiness. Whether you’re a sushi-making novice or a seasoned pro, taking the time to rinse your rice will make a noticeable difference in the quality of your sushi. So, the next time you’re preparing to make sushi at home, remember that a little rinse can go a long way toward creating a delicious and authentic sushi experience.
Can you freeze leftover Sushi Rice?
Cooking Sushi Rice In Rice Cooker Making sushi at home is a rewarding experience, but it often leaves you with leftover sushi rice. Since sushi rice requires specific preparation, you might wonder if freezing the leftovers is a viable option. While sushi rice is best enjoyed fresh, freezing it can be a practical solution to reduce waste and save time for future sushi-making sessions. Here’s what you need to know about freezing leftover sushi rice and how to do it effectively.
The Nature of Sushi Rice
Sushi rice, or shari, is prepared with short-grain rice and seasoned with a mixture of rice vinegar, sugar, and salt. This seasoning gives the rice its distinctive flavor and sticky texture, essential for making sushi. However, the unique qualities of sushi rice also make it more challenging to store, as it can quickly lose its texture and taste when not handled properly.
Can You Freeze Sushi Rice?
Yes, you can freeze leftover sushi rice, but there are some important considerations to keep in mind. Freezing may alter the texture slightly, making it less sticky and slightly drier than freshly made sushi rice. However, with the right technique, you can minimize these changes and still use the rice for future sushi rolls, sushi bowls, or other dishes.

How to Freeze Sushi Rice
To preserve the quality of your sushi rice, follow these steps when freezing:
Cool the Rice Quickly: After cooking and seasoning the rice, allow it to cool to room temperature. It’s important to cool the rice quickly to prevent it from becoming overly sticky or mushy. Spread the rice in a thin layer on a baking sheet to speed up the cooling process.
Portion the Rice: Divide the rice into individual portions before freezing. This way, you can thaw only the amount you need later. Each portion should be enough for one serving of sushi or another dish, usually about a cup or two.
Wrap the Rice Properly: Wrap each portion of sushi rice tightly in plastic wrap, pressing out as much air as possible. For extra protection, place the wrapped portions in a freezer-safe bag or airtight container. Removing as much air as possible helps prevent freezer burn and preserves the rice’s texture.
Label and Freeze: Label the containers with the date and contents, then place them in the freezer. Sushi rice can be stored in the freezer for up to one month without a significant loss of quality.
Thawing and Reheating Frozen Sushi Rice
When you’re ready to use your frozen sushi rice, follow these steps to thaw and reheat it:
Thaw in the Refrigerator: For the best results, thaw the rice in the refrigerator overnight. This slow thawing process helps maintain the rice’s texture.
Reheat Carefully: Once thawed, reheat the rice gently. You can do this in a microwave by placing the rice in a microwave-safe bowl and covering it with a damp paper towel. Heat the rice in short intervals, stirring occasionally until it’s warmed through.
Revive the Texture: If the rice seems a bit dry after reheating, you can revive its texture by sprinkling a small amount of water over it before reheating. The moisture will help restore some of the rice’s original stickiness.
Use Promptly: Once thawed and reheated, use the rice promptly. It may not be suitable for all types of sushi, but it can still work well in rolls, bowls, or as a side dish.
When Freezing Isn’t Ideal
While freezing is a convenient option, it’s worth noting that some sushi rice dishes are best made fresh. For example, if you’re planning to make nigiri or delicate rolls, the texture of freshly prepared rice is preferable. However, for sushi bowls, casual rolls, or other creative uses, frozen and reheated sushi rice can be a time-saving alternative.
Conclusion:
Freezing leftover sushi rice is a practical way to extend its shelf life and reduce food waste. While the texture may change slightly, proper freezing and reheating techniques can help you maintain the rice’s quality for future use. Whether you’re saving rice for a quick lunch or planning another sushi night, freezing sushi rice ensures that you always have this essential ingredient on hand. Discover top budget rice cookers that deliver perfect, fluffy rice without breaking the bank—ideal for everyday meals.
How do you reheat Sushi Rice?
Sushi rice, known for its delicate flavor and perfect sticky texture, is best enjoyed fresh. However, whether you have leftover rice from a sushi-making session or simply made a batch ahead of time, knowing how to reheat sushi rice properly is essential. Reheating sushi rice requires a gentle touch to restore its original texture and flavor without making it too dry, sticky, or mushy. Here’s a guide to reheating sushi rice so it tastes almost as good as freshly made.
Why Proper Reheating Matters
Sushi rice, or shari, is made from short-grain rice seasoned with rice vinegar, sugar, and salt. This preparation gives the rice its characteristic stickiness and flavor, which are key to making sushi. When sushi rice cools down, it can lose some of its moisture, becoming dry and firm. Reheating it improperly can exacerbate these issues, leading to rice that is either too hard or overly sticky. Proper reheating techniques are designed to gently warm the rice while rehydrating it to bring back its soft, tender texture.
Methods for Reheating Sushi Rice
There are a few methods you can use to reheat sushi rice, each with its own advantages. The key is to add moisture during reheating to help revive the rice’s original texture.
1.Microwave Method
The microwave is a quick and convenient way to reheat sushi rice. Here’s how to do it:
Portion the Rice: Place the desired amount of sushi rice in a microwave-safe bowl.
Add Moisture: Sprinkle a tablespoon of water over the rice. If the rice is particularly dry, you can add a little more water. The moisture helps to rehydrate the rice as it heats.
Cover the Bowl: Cover the bowl with a damp paper towel or a microwave-safe lid. The damp paper towel creates steam, which helps to keep the rice moist.
Heat in Short Intervals: Microwave the rice on medium power for 30-second intervals. After each interval, gently fluff the rice with a fork to distribute the heat evenly. Continue until the rice is warmed through.
Check Consistency: If the rice is still dry, add a bit more water and heat for another 10-15 seconds.
2.Steaming Method
Steaming is a gentler way to reheat sushi rice, helping to preserve its texture and moisture:
Set Up a Steamer: Use a bamboo steamer or a regular steamer basket. Line the steamer with a damp cloth or parchment paper to prevent the rice from sticking.
Add the Rice: Spread the rice evenly in the steamer, breaking up any clumps.
Steam the Rice: Place the steamer over boiling water and cover with a lid. Steam the rice for 5-10 minutes, checking occasionally to ensure it’s warming evenly.
Fluff the Rice: Once heated, fluff the rice gently with a fork or rice paddle. If the rice is still slightly dry, you can sprinkle it with a bit of water before steaming for another minute or two.
3.Stovetop Method
Reheating sushi rice on the stovetop allows for more control over the heat and moisture levels:
Prepare a Pan: Heat a non-stick pan over low heat. Add a small amount of water (about 2 tablespoons) to the pan.
Add the Rice: Place the sushi rice in the pan, breaking up any large clumps.
Cover and Heat: Cover the pan with a lid to trap steam.
Check Moisture: If the rice seems dry, add a little more water and cover again, letting it heat until it reaches the desired temperature and consistency.
Tips for Reheating Sushi Rice
Avoid Overheating: Sushi rice is delicate, so avoid reheating it too quickly or at too high a temperature. This can cause the rice to become too dry or overly sticky.
Use Fresh Water: Always use fresh, cold water when reheating sushi rice. This helps to rehydrate the grains without adding any unwanted flavors.
Reheat Only What You Need: Sushi rice is best reheated in small portions. Reheating a large amount of rice at once can make it difficult to maintain even moisture and heat distribution.
When Reheating Might Not Be Ideal
While these methods work well for reheating sushi rice, it’s important to note that the quality of reheated rice may not be as high as when it’s freshly made. For delicate sushi rolls or nigiri, freshly prepared rice is preferable. However, reheated sushi rice can still be used effectively in sushi bowls, hand rolls, or as a side dish.
Conclusion:
Cooking Sushi Rice In Rice Cooker Reheating sushi rice is a simple process, but it requires attention to detail to ensure the rice retains its essential qualities. By adding moisture and heating the rice gently, you can revive leftover sushi rice and enjoy it in a variety of dishes. Whether you’re making a quick sushi bowl for lunch or preparing leftover rice for dinner, these reheating methods will help you make the most of your sushi rice, reducing waste and maximizing flavor. Find the best rice cookers that combine advanced features, ease of use, and perfect results every time—ideal for any kitchen.
As an Amazon Associate, We earn from qualifying purchases. When you purchase a product through Amazon links on kitchenadvising.com, we may earn a small commission at no extra cost to you. This helps support the site and keep our content free.