
Introduction:
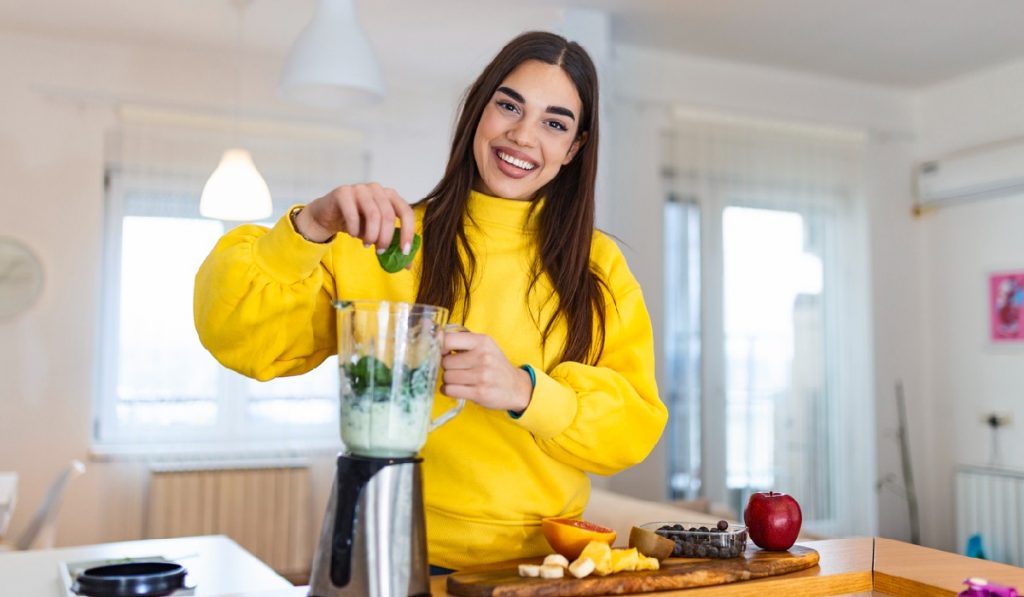
How To Make Juice In Blender Making juice at home is a wonderful way to ensure you’re consuming fresh, natural ingredients without the added sugars or preservatives often found in store-bought options. While many people assume you need a juicer to make juice, a blender can be just as effective. With a few simple steps, you can create delicious, nutritious juices right in your kitchen.
Why Use a Blender for Juicing?
Blenders offer several advantages over traditional juicers. First, they’re more versatile, allowing you to make smoothies, soups, and other blended foods in addition to juice. Second, blenders typically retain more fiber from fruits and vegetables, which is beneficial for digestion and overall health. Finally, blenders are often easier to clean and maintain compared to juicers, making them a more convenient option for everyday use.
What You’ll Need
Before you begin, gather the following:
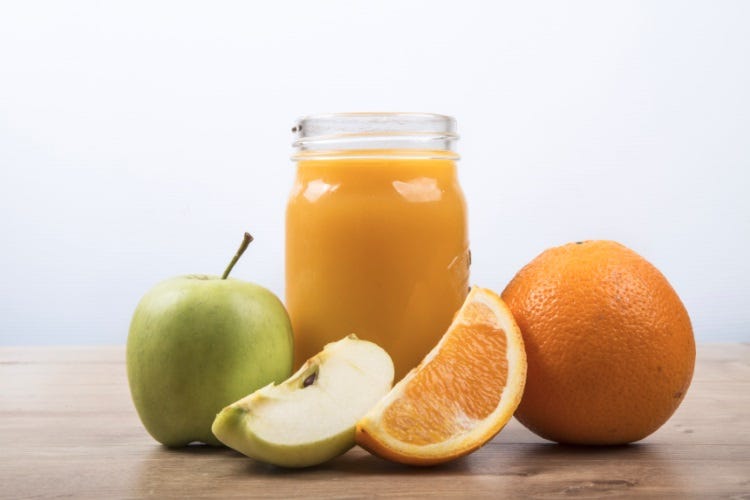
Fresh fruits and vegetables: Choose your favorites! Popular options include oranges, apples, carrots, cucumbers, and leafy greens like spinach or kale.
A high-powered blender: While any blender can work, a high-powered blender will give you the smoothest consistency.
Water or another liquid: This helps the blending process. You can use water, coconut water, or even almond milk for a different flavor.
A fine mesh strainer or nut milk bag: If you prefer a smoother juice without pulp, these tools will help strain out the solid bits.
A knife and cutting board: For prepping your fruits and vegetables.
Step-by-Step Guide to Making Juice in a Blender
1.Prepare Your Ingredients
Start by washing all your fruits and vegetables thoroughly. If necessary, peel the fruits (such as oranges or pineapples) and remove any seeds or pits. Cut the produce into smaller chunks to make the blending process easier.
2.Blend the Ingredients
Place the chopped fruits and vegetables into the blender. Add a cup of water or your chosen liquid to help everything blend smoothly. If your blender has variable speed settings, start on a low speed and gradually increase to high. Blend until the mixture is smooth and well-combined.
3.Strain the Juice (Optional)
If you prefer a pulp-free juice, pour the blended mixture through a fine mesh strainer or nut milk bag into a large bowl or pitcher. You can save the leftover pulp for use in baking, smoothies, or composting.
4.Taste and Adjust
Taste your juice and make any adjustments as needed. If it’s too thick, add a little more water or liquid. If you’d like it sweeter, consider adding a touch of honey or a natural sweetener.
5.Serve and Enjoy
Pour your freshly made juice into a glass, add ice if desired, and enjoy! Fresh juice is best consumed immediately, but you can store any leftovers in the refrigerator for up to 24 hours.
Tips for Making the Best Juice
Balance flavors: Mix sweet fruits with vegetables or tart fruits for a well-rounded flavor profile.
Experiment with combinations: Try different fruit and vegetable pairings to find your favorite flavors. For example, apple, carrot, and ginger make a refreshing and slightly spicy juice.
Use fresh, ripe produce: The quality of your juice depends on the quality of your ingredients. Choose ripe, fresh produce for the best taste and nutritional benefits.
Conclusion
Making juice in a blender is a quick and easy way to enjoy fresh, homemade beverages without the need for special equipment. With just a few simple ingredients and steps, you can create delicious and healthy juices that are perfect for any time of day. Whether you’re looking to boost your intake of fruits and vegetables or simply enjoy a refreshing drink, blending your juice at home is a great option. So grab your blender, get creative with your ingredients, and start juicing today!
Can you juice vegetables in a blender?
Juicing vegetables is a popular way to boost your intake of vitamins, minerals, and antioxidants. While juicers are traditionally used for this purpose, you might wonder: can you juice vegetables in a blender? The answer is a resounding yes! Blenders offer a convenient and effective way to make vegetable juice, often with the added benefit of retaining more fiber. Here’s everything you need to know about juicing vegetables in a blender.
Why Use a Blender for Juicing Vegetables?
Blenders are versatile kitchen appliances that can do much more than just make smoothies. When it comes to juicing vegetables, using a blender has several advantages:
Retains Fiber: Unlike traditional juicers that separate juice from pulp, a blender retains the fiber from vegetables, making the juice thicker and more filling. This fiber is crucial for digestive health and can help you feel fuller longer.
Cost-Effective: If you already own a blender, there’s no need to invest in a separate juicer. A good blender can handle a wide range of vegetables, saving you money and counter space.
Easy to Use and Clean: Blenders are generally easier to clean than juicers, which can have multiple parts that need to be disassembled and washed. With a blender, you simply blend, strain (if desired), and rinse.
How to Juice Vegetables in a Blender
Juicing vegetables in a blender is straightforward and doesn’t require any special skills. Here’s a step-by-step guide:
1.Select Your Vegetables
Choose fresh, high-quality vegetables. Popular options include leafy greens (like spinach, kale, or Swiss chard), cucumbers, carrots, celery, and beets. You can also add a small amount of fruit, like an apple or lemon, to enhance the flavor.
2.Wash and Prep the Vegetables
For harder vegetables like carrots or beets, you may want to peel them. Cut the vegetables into smaller pieces to make blending easier.
3.Blend the Vegetables
Add the chopped vegetables to your blender. Pour in a small amount of water or another liquid like coconut water to help with the blending process.
4.Strain the Juice (Optional)
If you prefer a smoother juice without pulp, strain the mixture through a fine mesh strainer, cheesecloth, or nut milk bag. The leftover pulp can be used in soups, stews, or even baking.
5.Serve and Enjoy
Pour your fresh vegetable juice into a glass and enjoy immediately. Fresh juice is best consumed right away to maximize the nutrient content, but it can be stored in the refrigerator for up to 24 hours.
Tips for Blending the Best Vegetable Juice
Balance Flavors: Vegetables like kale and spinach can have a strong, earthy flavor. Balance these with sweeter vegetables like carrots or fruits like apples.
Add Fresh Herbs: Fresh herbs like mint, parsley, or cilantro can add a refreshing twist to your juice.
Use Cold Water: Blending can generate heat, which may affect the nutrient content of your juice. Using cold water or ice cubes can help keep the juice cool during blending.
The Nutritional Benefits of Juicing Vegetables
Juicing vegetables in a blender allows you to pack a lot of nutrition into a single glass. Here are some key benefits:
High in Vitamins and Minerals: Vegetables are rich in essential nutrients like vitamin C, vitamin K, potassium, and magnesium.
Boosts Antioxidant Intake: Many vegetables are high in antioxidants, which help combat oxidative stress and reduce the risk of chronic diseases.
Supports Hydration: Vegetables like cucumbers and celery have high water content, which can help keep you hydrated.
Conclusion
Juicing vegetables in a blender is a practical and efficient way to enjoy the benefits of fresh juice without needing a separate juicer. By retaining more fiber and using a versatile appliance you likely already own, you can create delicious, nutrient-packed juices that are both satisfying and good for your health. Whether you’re looking to add more vegetables to your diet or simply enjoy a refreshing drink, your blender is a powerful tool that can help you achieve your wellness goals. So go ahead, grab your favorite vegetables, and start blending your way to better health! Easily crush ice in your blender with these tips. Perfect for smoothies, frozen drinks, and more. Achieve a smooth, icy blend every time!
How long should you blend juice?
Blending juice at home is a quick and convenient way to enjoy fresh, nutrient-packed beverages. However, a common question arises: how long should you blend juice? The blending time can impact not only the texture and consistency of your juice but also its flavor and nutritional value. Here’s a guide to help you determine the ideal blending time for your homemade juices.
Factors Influencing Blending Time
Several factors determine how long you should blend juice, including the type of ingredients, the power of your blender, and your desired juice consistency. Let’s break down these factors:
1.Type of Ingredients
Soft Fruits and Vegetables: Ingredients like bananas, berries, cucumbers, and spinach blend quickly. For these, 30 to 45 seconds is usually sufficient to achieve a smooth consistency.
Hard Vegetables and Fruits: Ingredients like carrots, beets, and apples require a bit more time to break down. Blending these for 1 to 2 minutes ensures a smoother texture.
Leafy Greens: Blending leafy greens like kale or chard may take slightly longer, around 1 to 1.5 minutes, especially if they are tough or fibrous.
2.Blender Power
High-Powered Blenders: If you’re using a high-powered blender, like a Vitamix or Blendtec, blending times can be shorter. These blenders can pulverize most ingredients in about 30 to 60 seconds.
Standard Blenders: For standard blenders, you might need to blend for up to 2 minutes to achieve a smooth consistency, especially with tougher ingredients.
3.Desired Consistency
Smooth Juice: For a juice that’s smooth and free of chunks, blend for 1 to 2 minutes, depending on your blender’s power and the ingredients.
Thicker, Pulpier Juice: If you prefer a juice with more body or pulp, blend for a shorter time, around 30 to 45 seconds. This will leave some texture in the juice.
Tips for Achieving the Best Blended Juice
Start Slow, Then Increase Speed: Begin blending on a low setting, then gradually increase the speed. This helps to prevent the ingredients from splattering and ensures everything is evenly blended.
Use Enough Liquid: Adding enough water, coconut water, or another liquid helps the blender process the ingredients more efficiently, reducing blending time and ensuring a smooth juice.
Check and Adjust: After 30 seconds, stop the blender and check the consistency. If there are still chunks or if the juice isn’t smooth enough, continue blending in 10-15 second intervals until you reach your desired consistency.
Avoid Over-Blending: Over-blending can introduce excess air into the juice, making it frothy. Additionally, the heat generated from prolonged blending can slightly degrade the nutrients in the juice. Aim for the shortest blending time needed to achieve the right consistency.
How to Tell When Your Juice is Ready
Your juice is ready when it reaches the desired consistency, and the ingredients are fully blended. Here are some signs that your juice is perfectly blended:
Smooth Texture: The juice should be smooth, with no visible chunks or large pieces of fruits or vegetables.
Even Color: The color should be uniform, indicating that all the ingredients are fully incorporated.
No Sticking to Sides: If the ingredients are sticking to the sides of the blender, stop and scrape down the sides before continuing. This ensures everything is blended evenly.
Conclusion
Blending juice is a quick and easy process, but the exact time needed depends on the ingredients, your blender, and your preferences. Generally, blending for 30 seconds to 2 minutes will give you a perfectly smooth juice. Keep in mind the tips above to optimize your blending time and achieve the best possible results. By understanding how long to blend juice, you can enjoy fresh, homemade beverages that are just the right consistency every time. Make perfect frappes at home! Use a powerful blender to achieve a smooth, creamy texture with your favorite flavors and ice.

How to make smooth juice in a blender?
How To Make Juice In Blender your own juice at home is a fantastic way to enjoy fresh, nutrient-rich beverages tailored to your taste. However, achieving that perfectly smooth consistency can be a challenge, especially when using a blender instead of a juicer. With the right techniques and a little know-how, you can create velvety, smooth juice that rivals anything you’d buy in a store. Here’s how to make smooth juice in a blender, step by step.
Why Smooth Juice?
Smooth juice is not only easier to drink, but it also provides a more pleasant mouthfeel, making it more enjoyable, especially for those who might be sensitive to texture. Additionally, smooth juice is a great way to pack in a variety of fruits and vegetables while maintaining a refreshing, silky consistency.
Essential Tools and Ingredients
Before you start, make sure you have the following:
A high-powered blender: While any blender can work, a high-powered blender will give you a smoother juice in less time.
Fresh fruits and vegetables: Choose your favorites, such as oranges, apples, carrots, cucumbers, or leafy greens like spinach.
A liquid base: Water, coconut water, or even almond milk can help achieve a smooth consistency.
A fine mesh strainer, nut milk bag, or cheesecloth: To remove any remaining pulp and achieve an ultra-smooth texture.
A sharp knife and cutting board: For prepping your ingredients.
Step-by-Step Guide to Making Smooth Juice in a Blender
1.Select and Prepare Your Ingredients
Start by choosing a mix of fresh fruits and vegetables. Wash all your produce thoroughly to remove dirt and pesticides. Peel any fruits or vegetables with tough skins (like oranges or carrots), and remove seeds or pits. Chop the produce into smaller chunks to make blending easier.
2.Add Ingredients to the Blender
Place the chopped fruits and vegetables into your blender. Pour in your liquid base—this helps the blender process the ingredients smoothly. Generally, start with about one cup of liquid and add more if needed. The liquid not only helps with blending but also contributes to a smoother consistency.
3.Blend Gradually
Start blending on a low speed and gradually increase to high. This gradual increase helps to thoroughly break down the ingredients without overwhelming the blender. Blend for about 30 seconds to 1 minute, depending on the power of your blender and the toughness of the ingredients.
4.Strain the Mixture
To achieve a truly smooth juice, you’ll need to strain out the pulp. Pour the blended mixture through the strainer, pressing down with a spoon or spatula to extract as much liquid as possible. This step removes any fibrous bits and leaves you with smooth, pulp-free juice.
5.Taste and Adjust
After straining, taste your juice and make any necessary adjustments. If the juice is too thick, you can add a bit more liquid and stir it in. If it’s not sweet enough, consider adding a small amount of natural sweetener like honey or agave syrup.
6.Serve and Enjoy
Pour your smooth juice into a glass, add ice if desired, and enjoy immediately. Fresh juice is best consumed right away to maximize its flavor and nutrient content, but it can be stored in the refrigerator for up to 24 hours if needed.
Tips for Achieving the Smoothest Juice
Use Ripe Produce: Ripe fruits and vegetables blend more easily and result in a smoother juice.
Blend Longer if Needed: If your juice isn’t as smooth as you’d like after the initial blend, don’t hesitate to blend it a bit longer. High-powered blenders can handle extended blending times without overheating.
Add a Banana or Avocado: These fruits can add creaminess to your juice, making it smoother. Just be mindful that they’ll also change the flavor profile.
Chill Your Ingredients: Blending can generate heat, which might slightly affect the texture of your juice. Using chilled ingredients can help keep the juice cool and smooth.
Common Mistakes to Avoid
Overloading the Blender: Adding too many ingredients at once can strain the blender and result in a chunky juice. Blend in batches if necessary.
Using Too Little Liquid: Not adding enough liquid can cause the blender to struggle, resulting in a lumpy texture. Always start with at least a cup of liquid and add more as needed.
Skipping the Strain: If you want a truly smooth juice, don’t skip the straining step. Even the best blenders can leave tiny bits of pulp that straining will remove.
Conclusion
How To Make Juice In Blender Making smooth juice in a blender is easier than you might think. By carefully selecting your ingredients, blending gradually, and taking the time to strain the mixture, you can create a silky, delicious juice that’s perfect for any time of day. With these simple steps, your homemade juice will be smooth, refreshing, and packed with nutrients, making it a healthy addition to your daily routine. So grab your blender, pick your favorite fruits and vegetables, and start blending your way to perfectly smooth juice!
As an Amazon Associate, We earn from qualifying purchases. When you purchase a product through Amazon links on kitchenadvising.com, we may earn a small commission at no extra cost to you. This helps support the site and keep our content free.